 First things first: I promise to try to limit the related posts in the future and I apologize to the legions of l337 coders for the continued coverage.
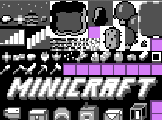
Right, now, on to todays topic: "Colour like that" (Awright, punning on my own blog post titles!). While watching the livestream of Minicraft, I was intrigued by his dynamic sprite colorising. After a little reverse engineering and experimentation I realised it was dang simple, and we could apply something similar to HTML5 games.
The idea is that you create your sprite sheet using only 4 colours. At runtime, you replace the 4 colours with any colours you like - so you can quickly modify the look and feel of the game, or have varied characters that differ only by colour - just like the ol' NES games.
While 95% of the code is extremely straightforward and obvious, the colour system got a bit hairy due to the fact he faffed around with the implementation a few times to get the result he wanted. The end result seems more complex than it really is. The overview of the system goes like so:
1. Set up a limited (256 colour) indexed palette to be used in the game. The colour channels will be divided into 5 "shades".
2. Draw the sprites in 4 colours. When loading the image into the game, reduce the pixels to values from 0 to 3 to represent the colour.
3. When drawing a sprite to the screen, dynamically pass in the 4 colours to use.
4. For each pixel, find the index in the palette and replace the pixel with that colour.
5. Profit!
The trickiest part is realising that someone just made up a custom colour selecting system. Throughout the Minicraft code you'll see lots of instances of a line like: Color.get(100, 232, -1, 555) - although it kind of looks like some kind of RGBA format, it's really defining 4 separate colours, each made up of 3 channels. The number 100 represents r = 1, g = 0, b = 0 and would be a very dark red. 555 represents r = 5, g = 5, b = 5 and would be white (full red, full green, and full blue). So let's see it in action...
In Game.java, the colour palette is set up. It uses 6 bits per channel to get our 256 colours in 5 shades. Here's the directly ported JavaScript version (well, except that I'm passing in the number of bits to use, so you can play with it):
function InitPalette(colours, bits) {
  // Set colours
  for (var r = 0; r < bits; r++) {
    for (var g = 0; g < bits; g++) {
      for (var b = 0; b < bits; b++) {
        var rr = r * 255 / (bits - 1),
            gg = g * 255 / (bits - 1),
	    bb = b * 255 / (bits - 1);

        // Set the mid tone
        var mid = (rr * 30 + gg * 59 + bb * 11) / 100;

        // Tint the palette
        var r1 = ~~(((rr + mid * 1) / 2) * 230 / 255 + 10),
            g1 = ~~(((gg + mid * 1) / 2) * 230 / 255 + 10),
            b1 = ~~(((bb + mid * 1) / 2) * 230 / 255 + 10);

        // Push RGB values into a single integer
        colours.push(r1 << 16 | g1 << 8 | b1);
      }
    }
  }
}
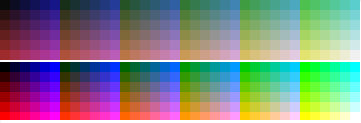
You can have a look at the palette that's generated by this function with this jsFiddle. One cool thing to notice is the tinting process. Try changing the final line to push the non-tinted values (rr instead of r1, gg instead of g1 etc). Without the tinting the game colours would look like this. Quite a nice way to give the game a "feel". Here they are side-by-side - the top one is tinted to be more "pastel-ly".
The final line colours.push(r1 << 16 | g1 << 8 | b1) converts the RGB values into a single integer (the shift-left operator moves the red bits up the top, the green bits in the middle, and leaves the blue bits at the end). If you want to use this in your HTML5 games, then it'd be better to skip this encoding and store each colour as a simple object - because we just need to decode it later (perhaps the shift version is faster in JavaScript too? Might need a bit of testing!).
Anyway - now we have an indexed palette of colours. To get the colours back at our will we need to use the accessor methods created in Color.java. Here's a JS version:
function GetColour(a, b, c, d) {
  function getIndex(d) {
    if (d < 0) return 255;
    var r = ~~(d / 100) % 10; // First digit
    var g = ~~(d / 10) % 10; // Second digit
    var b = d % 10; // Third digit
    return r * 36 + g * 6 + b;
  }

  return (getIndex(d) << 24) + (getIndex(c) << 16) + (getIndex(b) << 8) + (getIndex(a));
}
The original version is the same code, but he uses an overloaded get method for fetching the indexes. The final line returns a single integer like in the palette generation - it pushes the first colour 24 bits up the integer, the second colour 16 bits up etc. The value that it pushes is the index in the palette. This is calculated by the getIndex function by turning the decimal number into 3 channels. The function will accept a number between 0 and 555 (5 x reds, 5 x greens, and 5 x blues). If you put a number higher than 555 into it, it'll die. So don't do that.
Now we can get a single number to represent our 4 colours. GetColour(500, 50, 5, 505) == -1190846796 (Be careful, it's tempting to put 500, 050, 005, 505 so it looks nice, but remember - a leading 0 mean the number is octal in JavaScript, so 050 will actually be 40 in decimal).
Colouring in
Now that we have a way to encode the colours, we need to be able to decode them. Which is just a matter of reversing the getColour method, really: pop out the values and find the palette index! To show it in action I'll just draw 4 rectangles in the four colours specified by GetColour:
function DrawColours(ctx, colourInt, palette) {
    for(var i = 0; i < 4; i++) {
        var colIndx = (colourInt >> i * 8) & 255,
            col = palette[colIndx],
            b1 = col & 255,
            g1 = (col >> 8) & 255,
            r1 = (col >> 16) & 255;
        ctx.fillStyle = "rgb(" + r1 + "," + g1 + "," + b1 + ")";
        ctx.fillRect(i * 10, 0, 10, 10);
    }
}

DrawColours(ctx, GetColour(510, 0, 555, 55), colours);
The result is a red-ish rectangle, a black, a "white", and an aqua blue rectangle. The decoding part can be found in the Minicraft source in Screen.java in the render function. The original code looked like this:
int col = (colors >> (sheet.pixels[xs + ys * sheet.width + toffs] * 8)) & 255;. First the pixel colour (for 0 to 3) is found in the sprite sheet that corresponds with the current tile. This is the "i" from our DrawColours function. The number is then multiplied by 8 to get the correct distance to shift by (0, 8, 16, or 24 bits). The result is the number we pushed in with the GetColour call - which was the index of the palette to use. The actual colour components can then be extracted and drawn.
Ok, that's it for this post - it's getting too long. As you can see, the system is very simple - it's just encoding and decoding palette indexes. In the next post I'll show you how to load in the sprite sheet, covert it to the correct 0 - 4 format we need, and plot the colourised tiles. Sounds exciting, hey?
One Comment
So you can change the color of your objects and like in Super Mario, turn your bushes into clouds, but is there another reason/advantage for this method?
Is it faster, is a spritesheet significantly smaller?
Looking forward to your next post about the spritesheet