 Remember Pole Position? Outrun? PowerDrift? Lotus Esprit Turbo Challenge? Yeah you do! Remember jQuery 1.4? Most likely! Let's combine those two memories into one DIY project and make our very own old-school racing game with jQuery 1.4, shall we?
To prove it could work, here's an early proof-of-concept to hopefully pique your interest. It'll take us a few posts to get there - but that was just something I cobbled together (and the perspective is messed up)... it will be even cooler when we arrive!
Now, I know at this point you're probably pretty excited - but I should warn you up front, I have a poor track record of following through on promises of "multi-part" tutorials. To this day I still receive threatening, tearful emails wondering when "part 3" of my 3d with HTML5 will be complete. But I can promise you this: we may not end up with a game, but we WILL end up with at least a cool curvey racetrack with some cars on it. Even if it runs at 2 frames a second.
Anyhoo, let's get on with it. In this first part we'll get everything set up and our screen-drawing animation technique in place. In the next part we'll add racing stripes: and then things get awesome.
But first of all, a back-story. Over the course of my illustrious JavaScript tinkering days I've implemented countful "classics": Pong, shoot'em ups, platformers, Tetris... all the basics. When deciding on what to waste my time on next I started wondering about the ol' racing games of the past and how they worked. I spent a fair chunk of time trying to figure it out in my head... line drawing and curve algorithms and so forth. But I concluded that there must be some trick - no way could the C64 redraw a full bitmap screen so fast?! How could it be done?! It started to hurt my brain, and I was all set to give up... when out-of-the-blue a friend emailed me this tome of enlightenment.
Everything you've ever wanted to know about old racing games but were too stupid to figure out on your own! And of course, behind the technique is a genius-ly simple trick: take a flat image of a "perspective-style" road trailing off into the distance. Break the road into the individual lines that make up the image, then move those lines left or right as required to create the illusion of a curving road! Now, after pouring over Lou's Pseudo 3d Page v0.9 I've managed to get a racer-style road working (and looking very cool)... but I have probably misunderstood some of the finer points of his writings - so this might not be the nicest way to do it. But it's a start, hey!
The first thing that isn't really mentioned in the article, but I think needs to be done is to make the road image quite a bit wider than the view port - so that when the road "curves" sharply, and you position the line's X position waaaay out to one side, the line doesn't stop in the middle of the screen - thus revealing the whole trick. Click on the image below to see the road graphic we'll be using. There are two "roads" which we'll intersperse to create the stripey-road effect.
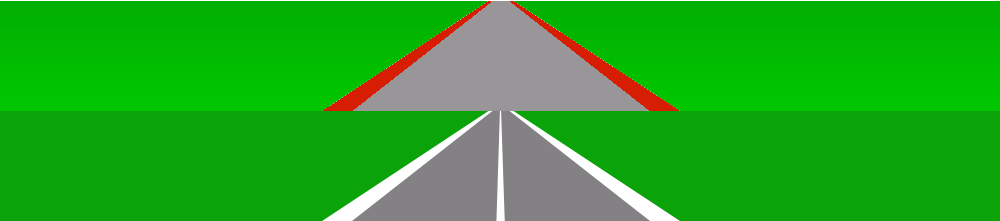
I've joined the two road graphics together so we can manipulate it as a CSS sprite. As you'd expect, HTML and CSS don't really give us a nice way to manipulate the lines of an image individually. We're going to need to do some trickery: add a couple of hundred 1 pixel-high div elements to the page, and assign them all the same background image. Then we'll offset the background image position to show the correct line for that part of the road! Dodgy, but cool!
Right, some code... Here's some "base" HTML for those following along at home: Racer v0.0.0.0, but there's nothing special in it - feel free to start your own.
#board{
	width:320px;
	background-color:#008ace;
}
.line{
	width: 320px;
	height: 1px;
	overflow: hidden;
	background:transparent url(road.png) no-repeat 0 0;
}
The "board" will be our main screen div element, and the line class will be the individual lines of the screen. You'll need to grab a copy of the road.png file from above. Next, we'll set up our object literal to hold all the game details in. This is our game "controller" and ensures we play nicely with any other JavaScript on the page.
var tracks = {
	num_strips: 220,
	half_num_strips: 110,
	strips : [],
	init : function(){
		// Set up the screen, then...
		// Start the animation running
		setInterval( function(){ tracks.update() }, 200 );
	},
	update : function(){
		// Update the screen
	}
};
We aren't doing anything yet - just setting everything up. Our tracks object will be responsible for setting up the screen, and then updating it every 200 milliseconds. We've also defined a few properties at the top: num_strips, half_num_strips, and strips. The strips array will hold a reference to each of the 1 pixel-high lines of the screen. The num_strips property defines how many pixels high the entire screen will be, and the half_num_strips is just half that: it saves us having to calculate num_strips / 2 all over the place (which is important in some of our loops!).
Right, let's draw the initial screen then shall we? Inside the init function, we want to make a loop that appends as many 1 pixel-high div elements that fit on our screen, and keep a reference to them for later.
// Draw the screen lines
for( i = 0; i < this.num_strips; i++ ){
	var strip = $( "<div></div>" ).addClass( "line" ).appendTo( "#board" );
	this.strips.push( strip );
}
Now we have 220 div elements squished inside the #board container div! To see it in action, you'll need to fire the tracks.init function in your document-ready handler:
$(document).ready(function(){
	tracks.init();
});
If you inspect the #board element with Firebug you'll see that there are hundreds of divs - but why isn't the first line of the image appearing in each div? Well, because I made the first line of the image transparent, 'cause I'm too lazy to do things properly. As always when you're being too lazy, it comes back to bight us later. But if you change the "no-repeat 0 0" in the css declaration to "no-repeat 1 0" or something like that, then you should see the repeated line fill the screen.
Having the same line repeated is not what we want though - we want to draw the entire road on screen. We'll have to do some math. In Lou's article he describes everything happening upside down - you draw the screen from the bottom to the top. I decided to do this too... it's going to make things scary later on when we get to "hills", but too bad. In the update function (which is being called every 200 milliseconds) we will set each line to its correct position. We know that (for now) we only have to draw from the bottom of the screen to half way up the screen (where the horizon starts), so we'll only loop over these lines. Inside the loop we'll calculate how far we need to move the background image to draw the correct line.
// Update the bottom half of the screen
for( var i = this.num_strips - 1; i >= this.half_num_strips; i-- ){
	var tex = 111;
	var y_off = ( i - ( this.half_num_strips ) ) + tex;

	this.strips[ i ].css( "background-position",  "-345px -" + y_off + "px"	);
}
Inside the loop we figure out the Y position for each screen line. The tex (for "texture") variable will be used later when it comes time to figure out how to draw the "racing stripes" on the road. The Y position offset is used to alter the background position of the image - so that the correct line is drawn in the correct place. The tex variable adds 111 pixels to the background image - that's why we see the bottom road. If you change it to 1, then you'll see it draws the top screen. Now, if you're feeling adventurous, change it to var tex = Math.random() < 0.5 ? 1 : 111; to get an idea about how the next tutorial will work!
The last thing we'll do is add a car, for good luck. It's just an image I ripped out of Pole Position. Looks lovely though. We'll define it with some CSS:
.car{
	width:90px;
	height:33px;
	background:transparent url(car.png) no-repeat 0 0;
	position:absolute;
	top:190px;
	left:122px;
}
And then in the init function (after the screen set up, and before the timer) we'll add it to the page with jQuery:
// Draw the car
var car = $( "<div></div>" ).addClass( "car" ).appendTo( "#board" );
Have a look at what we've got so far. Nothing spectacular - and hardly ANY jQuery... but the basics are in place and the scene is set. Have a play with all the variables and CSS properties we've set, and join me next time as we continue to push jQuery far in to the distant past!
One Comment
sorry, is a part 2 missing or does the tutorial really ends here? I’m confused.