 After getting my Atari 2600 half-finished masterpiece, Plops!, off my hard drive and onto the intertubes, I realised that I've found an easy way of achieving a nice feeling of closure without ever having to finish any of my half-arsed projects again: just chuck it up on my blog and consider it done!
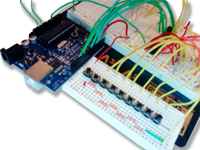
Accordingly, I present another work-in-progress: an Arduino-based MIDI step sequencer. This was a project I started a few months ago, got really into for an entire weekend, then got bored and left it sitting on top of my speaker to collect dust.
The project started after I dug up my old Dr Sample SP-808 "sampler". This was a bit of a toy that Boss put out in the 90s - not really a sampler, it was meant to be used for - I dunno actually, maybe just sampling some breakbeats to add to a mix or something. It was crap, and I hadn't touched it for 10 years. The thing that made it particularly useless was it's lack of a built-in sequencer of any kind, and although it could be sequenced with something like Ableton Live - there'd be no reason to do that - as Live is about infinity times more powerful on its own. I decided that it might be fun to make a step sequencer for it with my Arduino.
 Step sequencers are used to program drum machines and such (if you don't know what I'm talking about, check out this awesome 909-esque emulator done completely in JavaScript). It turns out that sending MIDI messages from the Arduino is simple as pie (an easy pie - like, one you just take out of the freezer and put in the oven for 40 minutes) and just requires you send the correct serial data to the MIDI connector.
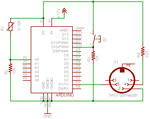 Once MIDI out was working, the only tricky part was multiplexing the input switches. You see, the Arduino comes with a handful of pins for doing input and output - but if you use one pin for every input then you'd quickly run out of inputs. Multiplexing let's you use a few pins to get a lot more inputs and outputs. I used the 4051 multiplexer chip that let's you send HIGH or LOW values to 3 pins, to choose one of 8 inputs/outputs at any given time. Since this was my first go at multiplexing, I thought I'd stick with a simple 8 step sequencer.
The result of my weekend of hacking was a usable sequencer that worked reasonably well. I gave up (and got bored) when it came to using a second multiplexer to show what notes were currently selected. Still, a fun experiment that breathed a lil' bit of life into some old hardware. The project will not be taken any further, however, because I need the breadboard back! But before I pull the plug, here' a demo of it in action...
3 Comments
do you have a schematic for this? i’d really love to do the same thing for my 404. great job!
It’s a SP-202. The SP-808 came out around the same time. You’re little Smartmedia card is now the 404-SX
w/ compact flash and the current successor to
the SP-808 is the MC-808 with motorized faders.
I’d look at the current Elektron Octatracker or the Akai MPC500/1000/2500/5000’s too. Nice project!
Ahh, yes! Good spot! The SP-808 was the big sampler machine thing – the 202 was just a strange toy! I’ve gone pretty much completely in-computer now, because I kept buying things like the sp202 which were useless ;)
I still secretly want an Akai MPC though!